
After getting my heating and power usage/generation in to EmonCMS I wanted to start pulling other sources of data into EmonCMS to I started looking for a more expandable method to bring multiple sources of data in to EmonCMS.
Open Energy Monitor, the folks behind EmonCMS, have recently started looking at Node-RED so I decided to also have a look at this.
It is also getting colder I wanted to get a bit more information on the operation of my OpenTRV board that has been sitting underused since the spring when I installed it on the radiator in the office.
Getting started
I won't go in to detail about downloading/installing Node-RED as there are good instructions in the Node-RED documentation and the Node-RED EmonCMS Node blog post includes instructions on installing the EmonCMS specific components.
First of all we need to get the data from the OpenTRV devices. In my setup this is via a USB to TTL adapter connected to the serial data port on the OpenTRV.
That is it for the hardware, but how do we get the data in to Node-RED? For this we need the Serial node;

Drag one on these to the work space and double click to open the settings;

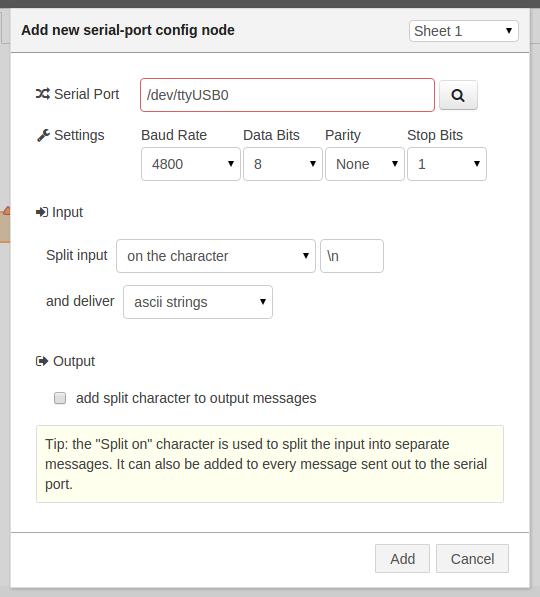
By default OpenTRV has a baud rate of 4800, 8-bits, no flow control and 1 stop bit. To set this up click the edit button and fill in these in the appropriate fields and select the serial port the OpenTRV board is connected to as below;
Next lets see if we have correctly set up the serial port. Drag a debug node to the workspace and connect the output of the serial node to the input of the debug node;

Next lets start this flow up by clicking on the deploy button;

On the right hand side of the window you can now select the Debug tab and you should start seeing the OpenTRV console output appearing after some time (can be up to 5 mins with the default OpenTRV settings).

Now we can start processing the data. As a first step we can do a quick clean up and get rid of any white space, particularly the return/line feed characters removed.
There is no handy built in node to do this but that is not a problem we can use the function node;

Drag one to the workspace and connect to the serial node output to the function node input. Next drag another debug node to the workspace connecting the function output to the debug node. We also want to make the white space easier to see so double click on each of the debug nodes and set the 'Output' to 'complete msg object'. In the end you should have something like this;

Now to write the function. Double click the function node and enter Trim for the name and the following for the function;
msg.payload = msg.payload.trim();
return msg;
Deploy and now we will see white space on the message output from the serial and if all goes well the debug of the function node output will not have the white space removed.

One thing to note here is if you hover over the output in the debug tab, the corresponding node that generated that entry will be highlighted. In the above case the mouse is over the debug from the function output and corresponding debug node is highlighted.
Let's move on and look at a simple log file of one OpenTRV TRV controller directly connected as described above.
=F0%@31C5;T13 42 W255 0 F255 0 W255 0 F255 0;S7 7 16;C1;{"@":"c2a2","L":1,"B|mV":3230,"occ|%":0,"vC|%":0}

>
=F0%@31C5;T13 42 W255 0 F255 0 W255 0 F255 0;S7 7 16;C1;{"@":"c2a2","L":1,"B|mV":3230,"occ|%":0,"vC|%":0}

>
=F0%@31C5;T13 42 W255 0 F255 0 W255 0 F255 0;S7 7 16;C1;{"@":"c2a2","L":1,"B|mV":3230,"occ|%":0,"vC|%":0}

>
=F0%@31C5;T13 42 W255 0 F255 0 W255 0 F255 0;S7 7 16;C1;{"@":"c2a2","L":1,"B|mV":3230,"occ|%":0,"vC|%":0}

>
=F0%@31C5;T13 42 W255 0 F255 0 W255 0 F255 0;S7 7 16;C1;{"@":"c2a2","L":1,"B|mV":3230,"occ|%":0,"vC|%":0}

>
=F0%@31C5;T13 42 W255 0 F255 0 W255 0 F255 0;S7 7 16;C1;{"@":"c2a2","L":1,"B|mV":3230,"occ|%":0,"vC|%":0}

>
There are three different types of output messages that we are getting. An empty line, a '>' and a line starting with '='.
The empty lines we can ignore. The '>' is telling us that the OpenTRV is ready to receive commands. This will be of interest to us later but right now it is the line starting with '='. This is the line that contains the status of the OpenTRV board. So let's sort out these lines. For this we use the Switch node.

This node takes an input and based on some criteria outputs it on one of the node outputs.
We need four condition;
- empty string,
- the '>' character,
- any line starting with '=' and
- everything else
Drag a switch node to the workspace and attach to the output of the Trim function node. As before double click the switch node to open the settings and fill in as below;

So what is this doing?
For the first output we are detecting the empty line case, this is done with 'matches regex'. With out going in to a lot of detail on regex (Regular Expressions) these allow you to do complex pattern matching and are very useful for processing text. In this specific case the regex ^ matches the start of the string and $ matches the end of the string and as there are no chars between the two chars this will match one match an empty string.
The second output is a bit simpler. This just checks for a direct comparison (==) to > to detect the case when we can send commands to the OpenTRV.
The third output is using a regex again. This time we are using ^ to match the start of the string then = to match the = char. So this will detect lines starting with = at the start of (and only at the start of) the line. This is important as the = char may occur in other parts of the string and we do not want to match those cases.
Finally the last output just catches everything else that falls through. We could do away with the first two cases and just let them fall through to here but actually adding code in to detect those cases allows us to check for errors and/or additional output we may have missed.
After deploying you should end up with something like this;

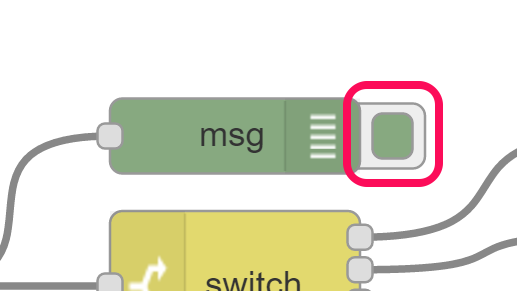
We can now check the debug output is coming from the correct node. Just hover over the debug output and the originating node will highlighted. Assuming all is correct, we probably want to reduce the amount of debug. We could just delete the node but the debug nodes can also be disabled and enabled on the fly without the need to delete the node and deploy the new flow. This is accomplished by clicking the tab to the left of the debug nodes;
Debug enabled

Debug disabled
For now lets disable all the debug nodes other than the one connected to the third output of the switch, the one outputting lines starting with '='.
We now have an output that is just the line that is the device status, we just need to parse it. There is no in built node that can parse the status text so we have to do it ourselves. Again we shall use the function node for this. Drag one on to the workspace and connect to the third switch output. Double click and lets write the code to parse the status line.
First create a new message to output with the parsed information;
var newMsg = { };
So that is the easy bit, next we want to break the string down in to the component parts. The easiest way I find of doing this is to use a regex, but that is a bit subjective as the regex syntax is not easy to understand. So lets look at the code;
var parts = msg.payload.match(/^=(F|W|B)([0-9]+)\%\@([0-9]+)C([0-9A-F]+)(;X([0-9]+) *)?;?(T([0-9]+ [0-9]+) ([^;]*))?;?(S([0-9]+) ([0-9]+) ([0-9]+))?;?(H([0-9]+ [0-9]+)*)?;?.*{(.*)}$/);
if(null === parts) {
    node.error("Failed to parse input", msg);
    return null;
}
Ignoring the regex for now this bit of code is fairly self explanatory, call the msg.payload.match method and if it returns null (no matches) raise an error and exit without generating and additional messages.
So now for the regex;
/^=(F|W|B)([0-9]+)%@([0-9]+)C([0-9A-F]+)(;X([0-9]+) *)?;?(T([0-9]+ [0-9]+) ([^;]*))?;?(S([0-9]+) ([0-9]+) ([0-9]+))?;?(H([0-9]+ [0-9]+)*)?;?.*{(.*)}$/Scary right? but lets break it down.
/^= ... $/
In JavaScript a regex is denoted by the / character just like a string is surrounded by ". We have also already seen the ^= and $ characters in our switch node to match lines starting with = then everything up to the end of the line.
(F|W|B)
This next bit looks for the mode which can be F (Frost), W (Warm) or B (Bake). So with this in mind it becomes a little clearer what is going on the | character matches the text on the left or the right. The other important bit here is the ( ), these encompass an sub-expression and allow us to refer to the matched string later. We all be using this a lot.
([0-9]+)%
Next we have the valve position. again we have the the parentheses marking the part of the string we are interested in. The [ ] operator matches any single character contained with in them and the 0-9 is short hand for any char from 0 to 9. The + matches one or more of the preceding character and finally the % just matches a % character. So this will match a sequence of one or more numbers followed by a %, but importantly only the numbers are matched for later use.
@([0-9]+)C([0-9A-F]+)
This next bit, the temperature, is basically the same as the valve, a literal match of @, a sequence of numbers, the C character followed by a hex number (0 to 9 or A to F).
(;X([0-9]+))?
This section is reading the first of the optional sections.This section at first looks similar to all the rest, ;X followed by a number, but that expression is surrounded by ( )? . The parentheses have the same function as before but we are also using the ? operator. This matches zero or one of the previous match and in this case that is the content of the parenthesis.
(;T([0-9]+ [0-9]+) ([^;]*))?
The set of characters is the time/program section. Again basically the same as previous sections with two exceptions. First there are multiple expression we are matching and second is the ([^;]*). This expression uses a * instead of a +. The * matches zero or more of the previous expression rather then the + that matches one or more. Second lets look at the content of the [ ]. At first you may think that this is looking for ^ or ; but the ^ character changes the meaning of the [ ] to be none of the contained characters, so this expression is matching zero or more characters that are not a ;.
(;S([0-9]+) ([0-9]+) ([0-9]+))?
(;H([0-9]+ [0-9]+)*)?
These next two sections are basically the same as the previous sections, the first matches the target temperatures and the second matches the house code.
;?.*
The penultimate bit is just a catch all for anything we don't understand before the last section.
{(.*)}$The final section detects the JSON format part of the string. This Is easiest to parse with Javascript's JSON parser so we just capture everything between the { }.
So that is the is the regex explained. Now if we look at the match expression again;
var parts = msg.payload.match(/ ... /);
This method returns an array containing the matched text and any parenthesised parts of the expression, I.E. parts[0] will be the full text that is matched, part[1] will be the first parenthesised sub-expression, parts[2] the second, etc.
We now have our string parsed and all the interesting parts stored in the parts array for us to use. So lets do that.
First lets deal with the bits that are always included.
newMsg.payload = {
    'frost': 'F' == parts[1] ? 1 : 0,
    'warm': 'W' == parts[1] ? 1 : 0,
    'bake': 'B' == parts[1] ? 1 : 0,
    'valve': parts[2],
    'temp': parseInt(parts[3]) + (parseInt("0x"+parts[4]) / 16)
};
Here we are starting to build our message with the parsed data. The mode is stored in part[1] and this is used to create three properties frost, warm and bake which will have a value 1 or 0 based on the mode. This may seam a little odd but this is a bit of forward planning as EmonCMS only accepts number values and separating it into these values will allow us to show indicators in an EmonCMS dashboard.
The valve position, stored in parts[2] is a simple one, we just assign that to the valve property.
Finally the temperature is stored in part[3] and part[4] is a little more complicated, part[3] is the whole degrees while part[4] contains a hex number representing the 1/16th of a degree. We use the parseInt function to convert the string to an integer to allow us to do the needed maths to combine the two parts and end up a floating point number of the temperature. This is assigned to the temp property.
We are going to handle the entries in parts in the order that the entries are matched, so next in we come to a few bits that I am just going to add place holders for later use;
// Security, 5-6
if(null !== parts[5]) {
}

// Time, 7-8
if(null !== parts[7]) {
}

// Program, 9
if(null !== parts[9]) {
}
If a particular parenthesised sub-expression is not matched (or rather has zero instances because of the ?) then it will have the value null in the parts array so here we are testing for a non-null value but not doing anything with the data, we can fill that bit in later if/when we need to.
// Target temps, 10-13
if(null !== parts[10])
{
    newMsg.payload.nominalTarget = parseInt(parts[11]);
    newMsg.payload.frostTarget = parseInt(parts[12]);
    newMsg.payload.warmTarget = parseInt(parts[13]);
}
Next we get to the target temperatures these are useful to know so we can see the temperature we are trying to get to. We store these as properties of the payload of your new message for use by the next node.
// House code, 14-15
if(null !== parts[14]) {
}
Next is the house code, this we can just put in a place holder for later use.
// JSON block, 16
if(null !== parts[16])
{
    var obj = JSON.parse('{'+parts[16]+'}');
    for(var i in obj)
    {
        switch(i)
        {
            case '@':
                newMsg.nodeid = obj['@'];
                break;
            case 'T|C16':
                var temp16 = parseInt(obj[i]);
                var temp = ((temp16 & ~0xf) >> 4) +
                           ((temp16 & 0xf) / 16);
                newMsg.payload.temp = temp;
                break;
            default:
                var mapping = {
                    'B|mV': 'battery',
                    'occ|%': 'occupancy',
                    'v|%': 'valve',
                    'O': 'occupancyState',
                    'vac|h': 'vacancyHours',
                    'L': 'ambientLight',
                    'H|%': 'humidity',
                    'vC|%': 'cumulativeValveMovement',
                    'tT|C': 'nominalTarget'
                }

                if(mapping[i]) {
                    newMsg.payload[mapping[i]] = obj[i];
                }
        }
    }
}
The final part is the parsing the JSON block. The JavaScript method JSON.parse does a lot of the hard work for us, but we still need to do a bit of work with the results.
In general we want all the data in the JSON block to be placed in the payload of the new message. Also as we are not tight on memory, expand the names in to something that is a bit more human readable. This is what is happening in the default section of the switch statement.
We do however have a few special cases. The first is the '@', this is the ID of the node so we do not really want that in the payload. Instead we place as a property of the message directly.
The other one that requires special handling is the current temperature. This is in 1/16 of a degree C to help reduce the size of the message sent over the radio. Again as the are not so worried about size we convert this to degrees C which is a bit more useful when it comes to analysing the data later.
Finally we can return our new message for processing by the next node.
return newMsg;
If we put this all together you should end up with;
var newMsg = {  };

var parts = msg.payload.match(/^=(F|W|B)([0-9]+)%@([0-9]+)C([0-9A-F]+)(;X([0-9]+))?(;T([0-9]+ [0-9]+) ([^;]*))?(;S([0-9]+) ([0-9]+) ([0-9]+))?(;H([0-9]+ [0-9]+)*)?;?.*{(.*)}$/);
if(null === parts) {
    node.error("Failed to parse input", msg);
    return null;
}

newMsg.payload = {
    'frost': 'F' == parts[1] ? 1 : 0,
    'warm': 'W' == parts[1] ? 1 : 0,
    'bake': 'B' == parts[1] ? 1 : 0,
    'valve': parts[2],
    'temp': parseInt(parts[3]) + (parseInt("0x"+parts[4]) / 16)
};

// Security, 5-6
if(null !== parts[5]) {
}

// Time, 7-8
if(null !== parts[7]) {
}

// Program, 9
if(null !== parts[9]) {
}

// Target temps, 10-13
if(null !== parts[10])
{
    newMsg.payload.nominalTarget = parseInt(parts[11]);
    newMsg.payload.frostTarget = parseInt(parts[12]);
    newMsg.payload.warmTarget = parseInt(parts[13]);
}

// House code, 14-15
if(null !== parts[14]) {
}

// JSON block, 16
if(null !== parts[16])
{
    var obj = JSON.parse('{'+parts[16]+'}');
    for(var i in obj)
    {
        switch(i)
        {
            case '@':
                newMsg.nodeid = obj['@'];
                break;
            case 'T|C16':
                var temp16 = parseInt(obj[i]);
                var temp = ((temp16 & ~0xf) >> 4) +
                           ((temp16 & 0xf) / 16);
                newMsg.payload.temp = temp;
                break;
            default:
                var mapping = {
                    'B|mV': 'battery',
                    'occ|%': 'occupancy',
                    'v|%': 'valve',
                    'O': 'occupancyState',
                    'vac|h': 'vacancyHours',
                    'L': 'ambientLight',
                    'H|%': 'humidity',
                    'vC|%': 'cumulativeValveMovement',
                    'tT|C': 'nominalTarget'
                }

                if(mapping[i]) {
                    newMsg.payload[mapping[i]] = obj[i];
                }
        }
    }
}

return newMsg;
After deploying if all has gone well then you should have something like this;

SENDING THE DATA TO EMONCMS
Now we have the data parsed, time to push it to EmonCMS. Drag an emoncms node to the workspace and connect to the output of our function;

Double-click the emoncms node to configure;

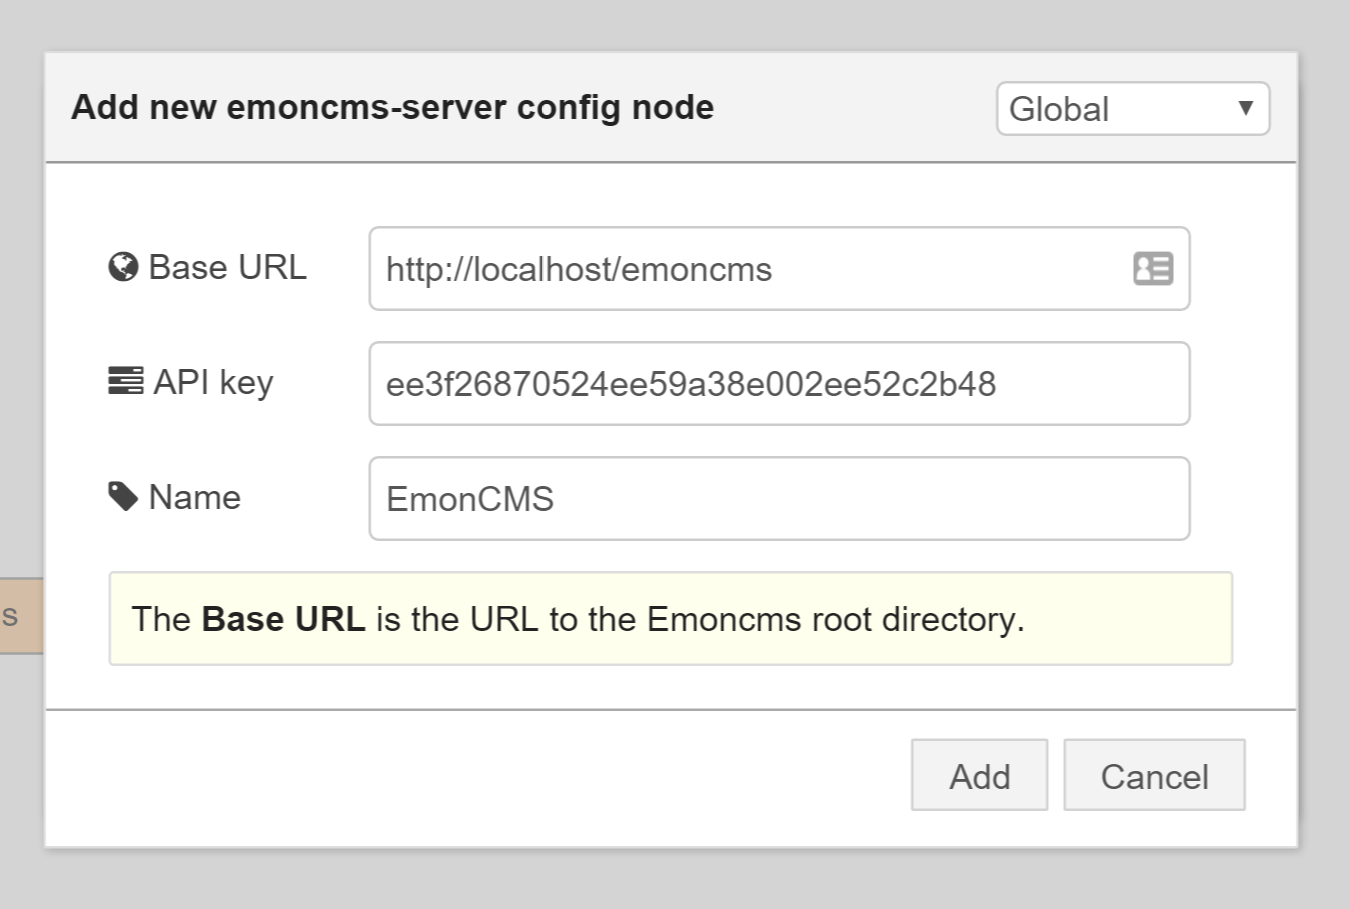
Click the edit button next to the Emoncms server drop down to add details of your server, in my case the EmonCMS server is installed on the same host
Select Add then enter a node ID in the node config window. Click Ok and deploy. If you now check the inputs of the of EmonCMS you should see the inputs have automatically been created;

So there we have it data being read from an OpenTRV node and feed in to EmonCMS with relative ease thanks to Node-RED.
THE QUICK WAY
You can also just import this flow directly to your Node-RED using this bit of magic JSON;
[{"id":"c6a48855.395b78","type":"emoncms-server","z":"","server":"http://localhost/emoncms","name":"EmonCMS"},{"id":"e914c08d.16eb4","type":"serial-port","z":"1cd21157.e32def","serialport":"/dev/ttyUSB1","serialbaud":"4800","databits":"8","parity":"none","stopbits":"1","newline":"\\n","bin":"false","out":"char","addchar":false},{"id":"9fccc574.603338","type":"serial in","z":"1cd21157.e32def","name":"","serial":"e914c08d.16eb4","x":170,"y":340,"wires":[["f5140166.0aec"]]},{"id":"f5140166.0aec","type":"function","z":"1cd21157.e32def","name":"Trim","func":"msg.payload = msg.payload.trim();\nreturn msg;","outputs":1,"noerr":0,"x":370,"y":340,"wires":[["895c112b.76a3f","6b5f8388.94a07c"]]},{"id":"895c112b.76a3f","type":"debug","z":"1cd21157.e32def","name":"","active":false,"console":"false","complete":"true","x":550,"y":280,"wires":[]},{"id":"6b5f8388.94a07c","type":"switch","z":"1cd21157.e32def","name":"","property":"payload","propertyType":"msg","rules":[{"t":"regex","v":"^$","vt":"str","case":false},{"t":"eq","v":">","vt":"str"},{"t":"regex","v":"^=","vt":"str","case":false},{"t":"else"}],"checkall":"false","outputs":4,"x":550,"y":340,"wires":[["429c7c77.bd6384"],["64924701.9b6db8"],["350ff59f.caf00a","4983e01b.b67c2"],["21d5644.fde2a9c"]]},{"id":"429c7c77.bd6384","type":"debug","z":"1cd21157.e32def","name":"","active":false,"console":"false","complete":"false","x":770,"y":240,"wires":[]},{"id":"64924701.9b6db8","type":"debug","z":"1cd21157.e32def","name":"","active":false,"console":"false","complete":"false","x":770,"y":284,"wires":[]},{"id":"350ff59f.caf00a","type":"debug","z":"1cd21157.e32def","name":"","active":true,"console":"false","complete":"false","x":770,"y":324,"wires":[]},{"id":"21d5644.fde2a9c","type":"debug","z":"1cd21157.e32def","name":"","active":false,"console":"false","complete":"false","x":770,"y":400,"wires":[]},{"id":"4983e01b.b67c2","type":"function","z":"1cd21157.e32def","name":"OpenTRV Parse Status","func":"var newMsg = { };\n\nvar parts = msg.payload.match(/^=(F|W|B)([0-9]+)%@([0-9]+)C([0-9A-F]+)(;X([0-9]+))?(;T([0-9]+ [0-9]+) ([^;]*))?(;S([0-9]+) ([0-9]+) ([0-9]+))?(;H([0-9]+ [0-9]+)*)?;?.*{(.*)}$/);\nif(null === parts) {\n node.error(\"Failed to parse input\", msg);\n return null;\n}\n\nnewMsg.payload = {\n //'raw': parts,\n 'frost': 'F' == parts[1] ? 1 : 0,\n 'warm': 'W' == parts[1] ? 1 : 0,\n 'bake': 'B' == parts[1] ? 1 : 0,\n 'valve': parts[2],\n 'temp': parseInt(parts[3]) + (parseInt(\"0x\"+parts[4]) / 16)\n};\n\n// Security, 5-6\nif(null !== parts[5]) {\n}\n\n// Time, 7-8\nif(null !== parts[7]) {\n}\n\n// Program, 9\nif(null !== parts[9]) {\n}\n\n// Target temps, 10-13\nif(null !== parts[10]) \n{\n newMsg.payload.nominalTarget = parseInt(parts[11]);\n newMsg.payload.frostTarget = parseInt(parts[12]);\n newMsg.payload.warmTarget = parseInt(parts[13]);\n}\n\n// House code, 14-15\nif(null !== parts[14]) {\n}\n\n// JSON block, 16\nif(null !== parts[16]) \n{\n var obj = JSON.parse('{'+parts[16]+'}');\n for(var i in obj) \n {\n switch(i)\n {\n case '@':\n newMsg.nodeid = obj['@'];\n break;\n case 'T|C16':\n var temp16 = parseInt(obj[i]);\n var temp = ((temp16 & ~0xf) >> 4) + \n ((temp16 & 0xf) / 16);\n newMsg.payload.temp = temp;\n break;\n default:\n var mapping = {\n 'B|mV': 'battery',\n 'occ|%': 'occupancy',\n 'v|%': 'valve',\n 'O': 'occupancyState',\n 'vac|h': 'vacancyHours',\n 'L': 'ambientLight',\n 'H|%': 'humidity',\n 'vC|%': 'cumulativeValveMovement',\n 'tT|C': 'nominalTarget'\n }\n \n if(mapping[i]) {\n newMsg.payload[mapping[i]] = obj[i];\n }\n }\n }\n}\n\nreturn newMsg;","outputs":1,"noerr":0,"x":808,"y":360,"wires":[["297b83ac.d6847c","d742c271.28bd4"]]},{"id":"297b83ac.d6847c","type":"debug","z":"1cd21157.e32def","name":"","active":true,"console":"false","complete":"false","x":1050,"y":320,"wires":[]},{"id":"d742c271.28bd4","type":"emoncms","z":"1cd21157.e32def","name":"Emoncms","emonServer":"c6a48855.395b78","nodegroup":"20","x":1040,"y":360,"wires":[]}]